
Installation guidance for ACO's trench drains & pits
The information on this page should be considered as general advice only.
ACO offers this guidance in good faith and if in doubt, engineering advice should be sought.
Typical installation drawings
| System | AS 3996 | Grass haunch to top | Pavers pavers to edge | Pavers haunch to top | Asphalt sloped haunch | Asphalt haunch to top | Concrete haunch to top |
||||||
|---|---|---|---|---|---|---|---|---|---|---|---|---|---|
| K50 (Gal rail) | Class A-B | - | - | - | - | ||||||||
| K50 (Gal rail) | Class C-D | - | - | - | - | ||||||||
| KS50 (S/S rail) | Class A-B | - | - | - | - | ||||||||
| KS50 (S/S rail) | Class C-D | - | - | - | - | ||||||||
| K100 (Gal rail) | Class A-B | ||||||||||||
| K100 (Gal rail) | Class C-D | ||||||||||||
| KS100 (S/S rail) | Class A-B | ||||||||||||
| KS100 (S/S rail) | Class C-D | ||||||||||||
| K200 (Gal rail) | Class A-B | ||||||||||||
| K200 (Gal rail) | Class C-D | ||||||||||||
| KS200 (S/S rail) | Class A-B | ||||||||||||
| KS200 (S/S rail) | Class C-D | ||||||||||||
| K300 (Gal rail) | Class A-B | ||||||||||||
| K300 (Gal rail) | Class C-D | ||||||||||||
| KS300 (S/S rail) | Class A-B | ||||||||||||
| KS300 (S/S rail) | Class C-D | ||||||||||||
| Brickslot | System | Nominal wheel load | Pavers pavers to edge | Concrete haunch to top |
||
|---|---|---|---|---|---|---|
| Brickslot 100 | K100 (Gal rail) | 2,670kg | ||||
| Brickslot 100 | K100 (Gal rail) | 8,000kg | ||||
| Brickslot 100 | KS100 (S/S rail) | 2,670kg | ||||
| Brickslot 100 | KS100 (S/S rail) | 8,000kg | ||||
| Brickslot 100 | H100K (Gal rail) | 2,670kg | ||||
| Brickslot 100 | H100K (Gal rail) | 8,000kg | ||||
| Brickslot 100 | H100KS (S/S rail) | 2,670kg | ||||
| Brickslot 100 | H100KS (S/S rail) | 8,000kg | ||||
| Double Brickslot 100 | K100 (Gal rail) | 2,670kg | ||||
| Double Brickslot 100 | K100 (Gal rail) | 8,000kg | ||||
| Double Brickslot 100 | KS100 (S/S rail) | 2,670kg | ||||
| Double Brickslot 100 | KS100 (S/S rail) | 8,000kg | ||||
| Double Brickslot 100 | H100K (Gal rail) | 2,670kg | ||||
| Double Brickslot 100 | H100K (Gal rail) | 8,000kg | ||||
| Double Brickslot 100 | H100KS (S/S rail) | 2,670kg | ||||
| Double Brickslot 100 | H100KS (S/S rail) | 8,000kg | ||||
| Twinslot 200 | K200 (Gal rail) | 2,670kg | ||||
| Twinslot 200 | K200 (Gal rail) | 8,000kg | ||||
| Twinslot 200 | KS200 (S/S rail) | 2,670kg | ||||
| Twinslot 200 | KS200 (S/S rail) | 8,000kg | ||||
| Twinslot 200 | H200K (Gal rail) | 2,670kg | ||||
| Twinslot 200 | H200K (Gal rail) | 8,000kg | ||||
| Twinslot 200 | H200KS (S/S rail) | 2,670kg | ||||
| Twinslot 200 | H200KS (S/S rail) | 8,000kg | ||||
| Double Brickslot 200 | K200 (Gal rail) | 2,670kg | ||||
| Double Brickslot 200 | K200 (Gal rail) | 8,000kg | ||||
| Double Brickslot 200 | KS200 (S/S rail) | 2,670kg | ||||
| Double Brickslot 200 | KS200 (S/S rail) | 8,000kg | ||||
| Double Brickslot 200 | H200K (Gal rail) | 2,670kg | ||||
| Double Brickslot 200 | H200K (Gal rail) | 8,000kg | ||||
| Double Brickslot 200 | H200KS (S/S rail) | 2,670kg | ||||
| Double Brickslot 200 | H200KS (S/S rail) | 8,000kg | ||||
| System | AS 3996 | Grass haunch to top | Pavers pavers to edge | Pavers haunch to top | Asphalt sloped haunch | Asphalt haunch to top | Concrete haunch to top |
||||||
|---|---|---|---|---|---|---|---|---|---|---|---|---|---|
| H200K Gal rail | Class A-B | ||||||||||||
| H200K Gal rail | Class C-D | ||||||||||||
| K200 (Gal rail) | Class A-B | ||||||||||||
| K200 (Gal rail) | Class C-D | ||||||||||||
| KS200 (S/S rail) | Class A-B | ||||||||||||
| KS200 (S/S rail) | Class C-D | ||||||||||||
| System | AS 3996 | Grass haunch to top | Pavers pavers to edge | Pavers haunch to top | Asphalt sloped haunch | Asphalt haunch to top | Concrete haunch to top |
||||||
|---|---|---|---|---|---|---|---|---|---|---|---|---|---|
| S100K | Class C-D | - | - | ||||||||||
| S100K | Class E-G | - | - | ||||||||||
| S200K | Class C-D | - | - | ||||||||||
| S200K | Class E-G | - | - | ||||||||||
| S300K | Class C-D | - | - | ||||||||||
| S300K | Class E-G | - | - | ||||||||||
| System | AS 3996 | Grass haunch to top | Pavers pavers to edge | Pavers haunch to top | Asphalt sloped haunch | Asphalt haunch to top | Concrete haunch to top |
||||||
|---|---|---|---|---|---|---|---|---|---|---|---|---|---|
| H100K Gal rail | Class A-B | ||||||||||||
| H100K Gal rail | Class C-D | ||||||||||||
| H200K Gal rail | Class A-B | ||||||||||||
| H200K Gal rail | Class C-D | ||||||||||||
| H300K Gal rail | Class A-B | ||||||||||||
| H300K Gal rail | Class C-D | ||||||||||||
| H100KS S/S rail | Class A-B | ||||||||||||
| H100KS S/S rail | Class C-D | ||||||||||||
| H200KS S/S rail | Class A-B | ||||||||||||
| H200KS S/S rail | Class C-D | ||||||||||||
| H300KS S/S rail | Class A-B | ||||||||||||
| H300KS S/S rail | Class C-D | ||||||||||||
| H100SK DI rail | Class C-D | ||||||||||||
| H100SK DI rail | Class E-G | ||||||||||||
| H200SK DI rail | Class C-D | ||||||||||||
| H200SK DI rail | Class E-G | ||||||||||||
| H300SK DI rail | Class C-D | ||||||||||||
| H300SK DI rail | Class E-G | ||||||||||||
| System | Nominal wheel load | Grass haunch to top | Pavers paver to edge | Pavers haunch to top | Asphalt haunch to top | Concrete haunch to top |
|||||
|---|---|---|---|---|---|---|---|---|---|---|---|
| Pit with Stainless 5 Star Heelsafe® Anti-Slip grate | 330kg | ||||||||||
| Pit with Galvanised Heelguard grate or Galvanised Transverse grate | 2670kg | ||||||||||
| Pit with Galvanised Transverse grate | 5000kg | ||||||||||
| System (AS 3996) | Pavers 1 pavers to edge | Pavers 2 haunch to top | Asphalt 1 sloped haunch | Asphalt 2 haunch to top | Concrete haunch to top |
|||||
|---|---|---|---|---|---|---|---|---|---|---|
| TD200 (Load Class D) | ||||||||||
| TD300 (Load Class D) | ||||||||||
| System (AS 3996) | Pavers 1 pavers to edge | Pavers 2 haunch to top | Asphalt 1 sloped haunch | Asphalt 2 haunch to top | Concrete haunch to top |
|||||
|---|---|---|---|---|---|---|---|---|---|---|
| QK100 (Load Class D) | - | - | - | - | ||||||
| QK200SF (Load Class D) | - | - | - | - | ||||||
| QK200SM (Load Class D) | - | - | - | - | ||||||
| QK200B (Load Class D) | - | - | - | - | ||||||
| System (AS 3996) | Pavers 1 pavers to edge | Pavers 2 haunch to top | Asphalt 1 sloped haunch | Asphalt 2 haunch to top | Concrete haunch to top |
|||||
|---|---|---|---|---|---|---|---|---|---|---|
| RD200V (Class D) | ||||||||||
| RD200V (Class G) | ||||||||||
| System (AS 3996) | Pavers 1 pavers to edge | Pavers 2 haunch to top | Asphalt 1 sloped haunch | Asphalt 2 haunch to top | Concrete haunch to top |
|||||
|---|---|---|---|---|---|---|---|---|---|---|
| Qmax 225/300/350 (Class D) | - | - | - | - | - | - | ||||
| Qmax 225/300/350 (Class G) | - | - | - | - | - | - | ||||
| Qmax 365/465/600 (Class D) | - | - | - | - | - | - | ||||
| Qmax 365/465/600 (Class G) | - | - | - | - | - | |||||
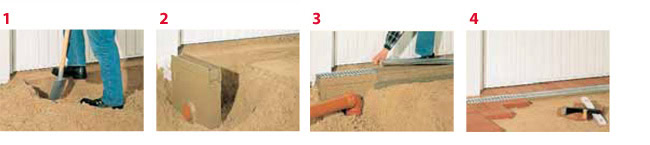
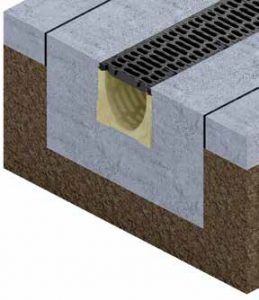
- Prepare a trench 200mm wide by 200mm deep. Fix a line along the trench at required finished height. Lay a bed of good quality concrete in the trench.
- Knock out the preformed outlet in the base of the channel or sump unit or fit a spigot stop end.
- Position outlet channel or sump unit in the concrete bed and ensure it is level. Connect to the drain or soakaway.
- Lay the remaining channels starting at the water outlet point. Hold each channel horizontally when lowering into the interlocking joint. Fit end caps.
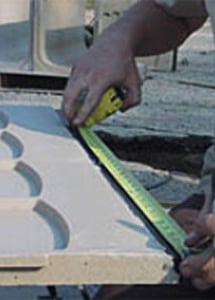
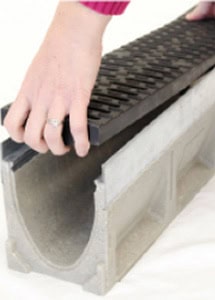
- Position grates and surround channels with concrete haunching. Paving bricks should be laid in a bed of mortar.
- Ensure the finished paving is 2-3 mm higher than the grates to assist drainage into the channel.
If required, ACO strongly recommends wet cutting, wet drilling and/or wet grinding of polymer concrete products in a well ventilated area with the use of personal protective equipment (including masks).
Plastic Sumps
- Excavate a hole to the required depth
- Cut sump with sharp knife or hacksaw to fit drainage pipe
- Position sump on sand bed or mortar.
- Connect the drain pipework to sump
- Backfill and make good surrounding area.
‘Polycrete’ Sumps
-
- Excavate a hole to the required depth.
- For pipe entry or exit, cut a hole of the required diameter in the plastic insert
- Lay the sump on sand bed or concrete if sump will be exposed to vehicular traffic
- Connect drainage pipework to sump and seal joint.
- Backfill and make good surrounding area.If required, ACO strongly recommends wet cutting, wet drilling and/or wet grinding of polymer concrete products in a well ventilated area with the use of personal protective equipment (including masks).
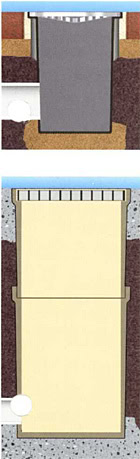
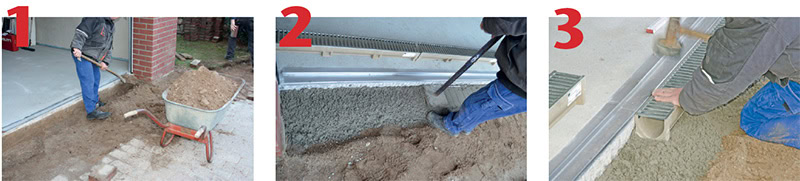
1. Excavate area to accommodate trench drain and 100 mm concrete surround.
2. Rough in 75 mm or 100 mm outlet pipe, compact excavation base and lay 100 mm deep concrete bed.
3. Knockout channel base for outlet.
4. Lay channels working away from outlet, channels slide-fit together.
5. Pour 100 mm concrete around channel sides allowing for pavement detail.
6. Finish pavement, pavers must be 3 mm higher than the grate.
For pedestrian only applications, trench drain can be set directly on well compacted soil. For driveway applications, trench drain MUST be surrounded 100 mm of concrete.
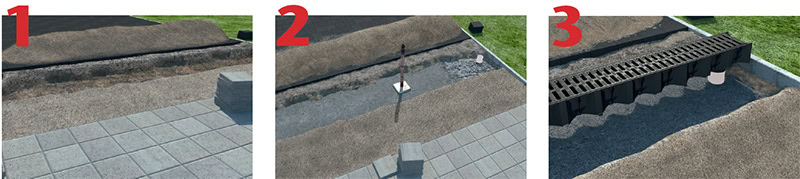
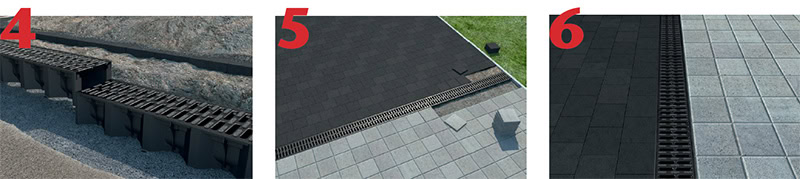
1. Excavate area to accommodate trench drain and 100 mm concrete surround.
2. Pour concrete bed 300 mm wide by 100 mm deep; keep outlet pipe clean.
3. Lay channels starting at outlet. Set a string line at required height to ensure level. Seal joints if required.
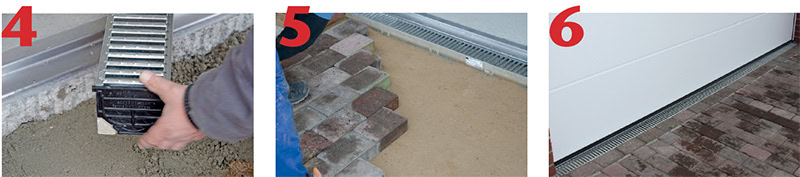
4. Fit end caps and insert grates. To keep concrete from getting onto grates or seam, protect grates with plastic.
5. Install pavers or finish pavement surround to required level, 3 mm above grate.
6. Clean away debris, remove protective plastic.
For driveway applications, trench drain must be surrounded by 100 mm of concrete.
If required, ACO strongly recommends wet cutting, wet drilling and/or wet grinding of polymer concrete products in a well ventilated area with the use of personal protective equipment (including masks).
Site specific topics

How to videos
Channel Setup Using Installation Devices
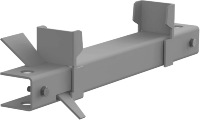
How to Install In Line Pit Extension Riser
How to Fit PVC Pipe to In Line Pit